Monday, November 14, 2011

Quick Fix

So I went on an organizing binge today (you'll see the majority of the results in my next post) and came up with a few new ideas for keeping things in order. One of my biggest problem areas is my jewelry box, as it is for most women. Specifically my bracelets needed an overhaul. They're one of my favorite accessories and I have tons of them. I had purchased some small plastic baskets to keep them in not too long ago, but they didn't keep things neat enough and the baskets were taking up more space than I wanted. After mulling over the problem for a little while I came up with an easy solution. Shower curtain rings!

I had an extra package of shower curtain rings laying around (weird I know) so I opened one up and slipped a couple of bracelets on it, snapped the ring back into place and ta-da! A bracelet holder. I put a couple of thumbtacks up and hung each ring off of one in a row. Now all of my bracelets and rings are organized by style and they make a pretty display on my wall.


Sunday, November 13, 2011

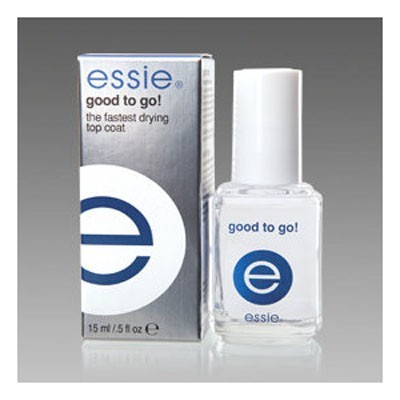
Pretty Product

Every now and then I like to share some of my favorite product finds, especially the ones that make life easier. One of the best products ever introduced to me is Essie's Good To Go nail top coat. This top coat literally dries nails completely in 10 minutes. I love to change my nail color so I usually do them myself (it's also much cheaper). However, I'm also extremely impatient and always want to jump to the next thing immediately after finishing the paint job. This means I usually end up messing them up. When I told a friend about this problem she introduced me to this wonderful product. Whether you do a french manicure or two coats of black your nails are dry in no time. Within the first five minutes they are only slightly sticky and within ten you can button a pair of jeans without worry. The top coat usually run about $10 to $12 but is definitely worth it. Especially since a bottle will last you much longer than a salon manicure, and that will usually run you the same price.


Monday, November 7, 2011

Warm and sugary deliciousness

One of the best things about fall is the food. As Thanksgiving approaches I've been deciding what dish I'm going to make to bring to my parent's and my boyfriend's parent's house for Thanksgiving dinner. One of my options is this delicious easy to make dessert. Cinnamon sugar apples is always good for a last minute get together since it doesn't take a lot of time to whip up.


What you'll need:
Apples. Depending on how big a dish you want to make the number of apples you'll need will vary. The recipe I'm using calls for 5 apples and will feed about five or six people.
1 teaspoon ground Cinnamon
1/4 teaspoon ground Nutmeg
1 teaspoon Sugar
1/4 cup Flour


Step one: peel each apple and cut off the outer edges around the core. You can also core the apple and chop up the remainder, but I prefer to just cut off as much apple from around the core as possible. Once you have gotten rid of all your apple cores, slice up the apple pieces into thin slices.

Step two: Mix all of your ingredients into a bowl. Then add your apples. Continue to mix the entire dish until the ingredients have turned into a syrup. Make sure all the apples are completely covered.

Step three: put your entire mixture into an oven friendly dish and cover with foil. Bake for about 40 minutes or until the apples are soft but not mushy.

Step four: Uncover and enjoy! Put them in a festive holiday dish for some extra sparkle.

Quick space saver

Since my apartment is small (thus the title of this blog) I'm constantly looking for ways to save room and keep thing organized. At the same time I'm adjusting to living with my boyfriend and an additional roommate. One of the biggest problem areas in our apartment is the sink. Everyone is constantly using cups and dishes (specifically my boyfriend and our friends) but no one cleans them. I don't mind doing the dishes but since I almost always end up washing everything at once I end up without enough drying space, particularly for glasses and tea cups. I would rather let the dishes air dry instead of drying them by hand so I came up with a quick, easy-to-do, space saving solution.


By putting this rack of hooks right above the sink I've created extra drying space, extra cabinet space and a cute way to display my tea cups. To create the rack I simply got this hook rack (you can get it at a hardware store, Home Depot, Target or even a dollar store). I then mapped out where I wanted to place it, using a level and pencil to mark where my screws should go. I screwed both screws in almost all the way and then placed the rack on them, screwing them in the rest of the way to lock the rack into place. Wallah! I've created some eye-pleasing storage space.

Monday, October 31, 2011

Trick or Treat

Happy Halloween!

Since my very first blog post is falling on Halloween night (as I sit here in my cat costume for the party we're having at my apartment tonight) I thought I'd show you one of my favorite Halloween snacks.

I made these Caramel Apples for my boyfriend and our friends a couple weeks ago for an impromptu get together at our place. Making caramel apples is really easy (believe me, I'm not exactly a master in the kitchen) and delicious.

What you'll need:

Apples
Caramel (either a block of caramel or the mini caramel candies will work)
Popsicle sticks or skewers
Candy (optional, I used Reese's Pieces)

1. Put the apples in the fridge overnight. The caramel sticks better if they're really cold.
2. Melt the caramel in a pot that will be deep enough to dip almost the entire apple in. If you don't have a very deep pot you can always use a spoon to help cover the apple. Make sure to melt the caramel at a low heat and constantly stir it to keep it from burning.
3. Wash the apples and dry them thoroughly. Stick your Popsicle sticks or skewers in the top of each one.
4. Dip the apple so that it's 3/4 of the way covered, leaving just the top of the apple showing. As I said earlier, you can roll the apple on its side in the caramel or use a spoon to spread the caramel on the apple if you don't have a deep enough pot.
5. Place the caramel covered apples on non-stick foil and let them cool.
6. Optional step - To change things up try crushing candy and rolling the caramel covered apples in them before setting them down to dry.
7. Share and Enjoy!