Showing posts with label diy. Show all posts

Monday, April 9, 2012

Caffeine please! : Summer snack #1

Alright, so I've gone completely mia in the past couple months due to some life changes but I'm back and ready to go. I'm soooo excited because it's almost my favorite time of year, summer! I've already started stepping up my work outs and getting a base tan and I can't wait to get on the beach. In honor of this wonderful season I thought I'd start sharing some of my favorite summer snacks and drinks that I make at home. The first of which, is iced coffee, a must in the summer. I love coffee but hate paying six bucks for flavored iced coffee at the store. So instead I make my own!

my coconut mocha coffee creation!


You can two this two different ways. If you're a big coffee drinker (like me) it's a good idea to store a lot of chilled coffee. To do this simply make a pot of coffee like usual, then transfer it to a jug that you can stick in your fridge. Let it get cold and then use it to pour yourself a cup of ice coffee whenever you want. Just add ice and milk or sugar to your taste. Keep in mind that as the ice melts it will water the coffee down, so don't use too much (this is why you chill the coffee first). I like to get different creamers from the store and make my own delicious drinks for a fraction of the cost.

If you only want an occasional cup of ice coffee then go the instant route. Simply put instant coffee in a cup and pour a small amount of boiling water in it. Mix the powder into the hot water until it dissolves. Then add ice and fill the rest of the cup with cold water. Wallah - instant iced coffee. Add whatever flavor you want!

Hope this helps keep your summer delicious, and your wallet full!

xo. AM

Thursday, January 26, 2012

Under wear?

Having an organized closet is the best way to get the most out of it. Reorganizing your clothes makes it easier to get ready in the morning and it reminds you of all the great pieces you haven't seen in awhile because you pushed them to the back of your closet after you got all that new stuff for Christmas. But this doesn't just go for the stuff you wear on the outside for all the world to see. When's the last time you organized your underwear?

A lot of people give up on organization when it comes to underwear because they're so hard to keep folded. Especially if you're a thong girl (guilty). It ends up being a big ball in a drawer and you can never find the ones you want. I decided to tackle my underwear drawer and my bra collection all at once.  When I was done I found a bunch of items I'd forgotten about and made everything easy to see/grab in a rush.

First, I tackled the bras. I have less of them so it seemed like an easier task. I'm not a pro on how to store your bras so they keep their shape but I knew I wanted to organize them in a way that I could see everything all at once. This was my result:


I used two fabric boxes from Ikea because I had some extras, but you can easily do this with a shoe box or two (to make it look pretty cover the box in paper or fabric). I figured the best way to keep the shape of the bra intact was to make sure the cups don't get crushed. It's hard to see in this picture but each bra basically just folds into the other one so that they maintain their curvy shape. Then I stuck the fabric boxes in a drawer  to keep them from prying eyes (lets ignore the fact that I've put a picture of them online).

Next, I moved to underwear which was a bit more difficult. After some brainstorming I decided to empty the tea bags out of the many boxes I have in my kitchen and put them in one big dish (this turned into a project of its own since I decided to make a tea tray but maybe I'll post that tomorrow). I cut the lid off the boxes so I was left with this:


Then I covered the boxes with a funky green construction paper and black electrical tape.


Mine were kind of sloppily covered because you're not really going to get a good look at the inside of them. I just wanted a uniform color. I did this to four boxes and stuck them in another fabric Ikea box, a little larger than the last two (Ikea must have been having a sale on these at some point because I have tons of them). Again, you can use a shoe box or plastic container or just stick the smaller boxes directly in a drawer to get the same effect.


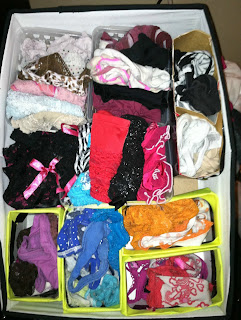
Then I covered a lightening bulb box (the kind that are divided into two sections) with black duck tape. I got some small baskets for $1 at Walgreens and added them to the back half of the box. The final result looks like this:

As I said I'm a thong girl, so I used the four front boxes specifically for them. I tend to match my underwear to my bra (I know I'm weird) so I organized them by color. I used the light bulb box (top right) for my basic black and white thongs. In the baskets (upper left) I folded all my bikini and boy shorts by style (all the plain cotton are together, all the comfy lace pairs are together and all the sexy but not so comfortable pairs are together). Now I can grab the color/style I'm looking for without searching through a ball of fabric. 

As a side note, the easiest way to organize items so that you can see everything you have at once and maximize space is by folding them into little squares and stacking them almost like file folders. This way, instead of having some stuff at the very bottom of the pile or behind other piles everything is showing at once and easy to grab. I did it with the boy shorts in the back and I do the same thing to all my t-shirts and tank tops. 

Now that you've seen all my intimates get to organizing your own!

Wednesday, January 25, 2012

Old is new again...

Well I've been an incredible slacker when it comes to posting in the past month and a half. I got a new job and settling in has taken up a lot of my time. However, I'm going to try to commit to posting semi-regularly now.

My boyfriend and I bought a new bed so of course I took the opportunity to move our bedroom around. So I was doing a little re-organizing/decorating yesterday (what else is new) and found a new jewelry fix. I have a ton of long necklaces that take up too much space to put on the wall with a shower curtain ring. Then I found an old doll closet that I used as a kid for my American Girl doll (the good old days).


I found that it was perfect for holding all the long necklaces so they don't get tangled. I had some extra room and found that it also made a great place to put all my sunglasses which are always everywhere and constantly getting lost. With the little extra room at the bottom I stacked all my jewelry gift boxes I've collected over the years (for some reason I hate to throw them out). They're great for storing small keepsakes or broken jewelry pieces for future craft projects. Now everything's organized and the old doll closet makes for a great room decoration.


I guess hoarding pays off sometimes.

PS. look closely and you can see me in the sunglasses!


Sunday, December 4, 2011

Holiday How To

It's my favorite time of year! Christmas has been my favorite holiday since I was a little kid and this is the first year that I have an apartment of my own to decorate. I took some decorations from my parents house since they have tons, but I also decided to get creative and make a couple. One of which is this cute table display.

All you need is a wine bottle or two, an empty coffee tin, glitter, wrapping paper, ribbon and some kind of christmas filler.

I cleaned the wine bottles and then painted them with green glitter. It's hard to tell in the picture but they sparkle when the light hits them. Then I tied some red ribbon around each bottle neck.


Then I took an empty coffee tin and covered it in Christmas wrapping paper. I had strings of small christmas ball garland. I pulled the balls from the garland and filled the tin with them. (I didn't have enough to fill the whole tin so I stuck tissue paper underneath to make it look full). You can easily use other Christmas fillers such as candy canes or ribbon, etc.

So easy and a great center piece, or in my case end table filler. 


Tuesday, November 29, 2011

Keeping things together...

Well I've been slacking. Finishing up the semester and job hunting has kept me pretty busy the last couple weeks. However, I promised to show my household "kits" that I've created so I'll get to it.

I like the idea of keeping things I use at the same time together and I like to make them easy to transport from one room to another. Our bathroom in our apartment has a ton of storage space so I keep a lot of things in there that I don't necessarily use in there. To solve the problem of moving everything from one room to another I made myself little kits out of thing I found in my kitchen cupboards and bedroom closet.

Kit #1 Nail Station


First I grabbed an old toiletry bag to hold all of my foot scrubs, lotions and salts. Then I found an old wristlet and an old makeup bag to hold my nail polishes in a cute organized bundle. Then I grabbed a foot sized Tupperware container and placed everything inside, including my nail polish remover.  Now when I want to give myself a mani-pedi I can just grab the container and bring it to the living room/bedroom and get to work. Plus the Tupperware container doubles as a foot soak when you fill it with hot water. 

Kit #2 Ironing Tools

This time I used a storage container to hold my steamer, anti-wrinkle spray, iron and lint brushes. I slid them on the shelf right next to my ironing board so i can grab everything at once and move it to an area where there's actually room to get rid of my wrinkles. One day I'll have my own laundry room with space dedicated to this, but for now this works for me. 

Kit #3 Hair Care


Finally, I wanted to get rid of the mess of clips, headbands, brushes and other hair tools that resided under my sink. So I grabbed a cloth box I had purchased from Ikea when I redid my bedroom last year and used it to corral all of my hair supplies. I washed out two plastic containers (like the ones that hold rice pudding or ricotta cheese, etc.) I used one for all my clips and a taller one for all of my hair brushes. I slid my blow dryer and hair straightener next to them. I used a small makeup pouch to hold all my bobby pins and hair-ties so they were easy to find. The I slid my headbands into the remaining space. I didn't have time to cover the plastic containers in any kind of wrapping/craft paper to make them more aesthetically pleasing but I'll get to it. For now it keeps everything in place and easy to get to when I'm rushing in the morning!

Monday, November 14, 2011

Quick Fix

So I went on an organizing binge today (you'll see the majority of the results in my next post) and came up with a few new ideas for keeping things in order. One of my biggest problem areas is my jewelry box, as it is for most women. Specifically my bracelets needed an overhaul. They're one of my favorite accessories and I have tons of them. I had purchased some small plastic baskets to keep them in not too long ago, but they didn't keep things neat enough and the baskets were taking up more space than I wanted. After mulling over the problem for a little while I came up with an easy solution. Shower curtain rings!

I had an extra package of shower curtain rings laying around (weird I know) so I opened one up and slipped a couple of bracelets on it, snapped the ring back into place and ta-da! A bracelet holder. I put a couple of thumbtacks up and hung each ring off of one in a row. Now all of my bracelets and rings are organized by style and they make a pretty display on my wall.


Monday, November 7, 2011

Quick space saver

Since my apartment is small (thus the title of this blog) I'm constantly looking for ways to save room and keep thing organized. At the same time I'm adjusting to living with my boyfriend and an additional roommate. One of the biggest problem areas in our apartment is the sink. Everyone is constantly using cups and dishes (specifically my boyfriend and our friends) but no one cleans them. I don't mind doing the dishes but since I almost always end up washing everything at once I end up without enough drying space, particularly for glasses and tea cups. I would rather let the dishes air dry instead of drying them by hand so I came up with a quick, easy-to-do, space saving solution.


By putting this rack of hooks right above the sink I've created extra drying space, extra cabinet space and a cute way to display my tea cups. To create the rack I simply got this hook rack (you can get it at a hardware store, Home Depot, Target or even a dollar store). I then mapped out where I wanted to place it, using a level and pencil to mark where my screws should go. I screwed both screws in almost all the way and then placed the rack on them, screwing them in the rest of the way to lock the rack into place. Wallah! I've created some eye-pleasing storage space.